I have a small garden but within it I try to add as much interest as I can. I have a few small trees and heavily planted borders with foliage plants to create a garden that you can walk through rather than see it all at once. I have small paths of grass, paving and gravel going in different directions throughout the garden. I also have three structures to walk through – a pergola, a corner walkway and an arch. I have deliberately sited these structures to connect areas to give them a bigger sense of scale. This post is about the smallest border in my garden.
My ‘Silver’ border is in my back garden which doesn’t get full sun – not growing conditions that you would normally expect to see silver plants. However I don’t always follow the rule of right plant, right place! I like to experiment with plants and if it doesn’t work, well, I’ve had fun trying.
How small? Well this border has a 6ft x 3ft open trellis along its length. It is 4ft at its widest thinning to 2ft. It really is tiny. Without the trellis it looks nothing. Add an arch next to the trellis connecting to the corner of the house wall and instantly this area, even without plants, has interest already. Walking round this border takes you on a journey even in this tiny area.
Going through the arch you walk through a small area of gravel on to concrete. The concrete backs the 6ft length of trellis. Walking round the trellis takes you on to a grass path with a mature clipped Griselina on your right with a bird table and feeder. From here you can look down the length of my ‘L’ shaped garden. Turn left and you are walking on another grass path along the front edge with golden grasses and Japanese Anemones spilling over the other grass edge behind you. Finally you step onto paving with a gravel mulch on either side and behind you is my small domed Acer tree. This is a tiny border but as there are other areas of interest surrounding it you are drawn into the space.
Limiting a colour pallet can add interest to any area but when the area is small I feel it works particularly well. Why silver in this area – simple I love silver foliage plants and they are a great contrast to the many shades of green in my back garden. I also look out on this area from my kitchen window. Oh and yes and the main reason – this year we celebrated our Silver Anniversary in July.
However, on a more practical note I thought it could give a real lift to this area. The previous trellis had been there some time and was rotten. As that was getting replaced it gave me the opportunity to consider a new colour for the wood stain. That was an easy choice as my camera Nestbox was already stained a colour that would be perfect – I chose a willow green.
I also painted the tired dull dark brown arch the same and this area had the appearance of being tripled in size. I was thrilled with how it looked. I had a twin seat with connecting table in another part of the garden – it too was given the willow green stain and placed under the kitchen window where it faced the smallest edge of the new border. This area expanded in scale once more – excellent!
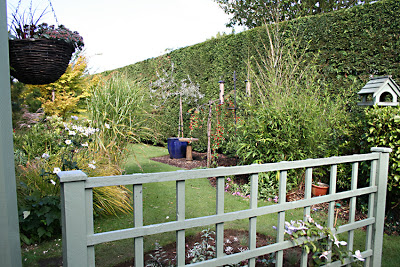
 The first photo above was taken today and shows how this small border fits in with the rest of my garden. The second photo is the view from my kitchen window taken early morning just four days later. I have chosen to add this photo as this area has changed once again. If you you look closely at the Acer tree on the left you will see its leaves are beginning to turn to shades of orange and yellow. This tree is great to look out on particularly at this time of year!
I also chose to dot this willow colour out into the garden by planting a weeping willow tree in a large pot and painting the bird table and another Nestbox on an ivy pole of my pergola the same willow colour. I also added a hanging basket with silver plants to my arch which hangs over the narrowest end of the border. You can see how my basket looks for autumn/winter. An insect theatre above the hanging basket – again stained willow added yet another dimension of interest. So what about the plants?
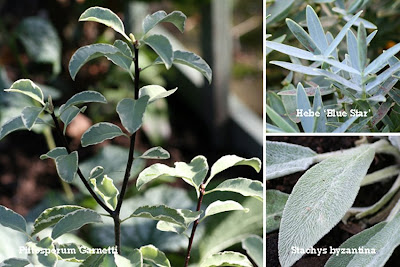
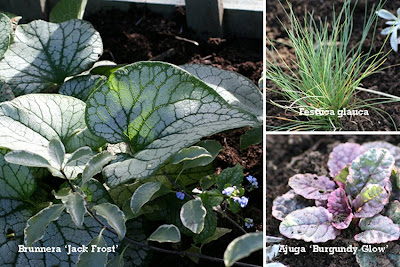
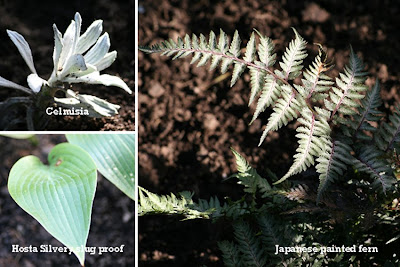
Tricky – I wanted to grow plants that would knit together in contrasting silver-green foliage which wouldn’t get full sun and if they had a flower it had to be small. The exception there was the trellis where the flower on clematis ‘Silver Moon’ was so delicate I didn’t mind it being larger. In all honesty I chose that one for the name too. It is going to be a great back drop and looks greyer alongside the willow colour of the trellis. The photos below show my selection of plants for this border. I also have the clematis ‘Miss Bateman’ growing up the trellis of the arch and the beautiful rose ‘Silver Anniversary’ in the border but both have passed flowering.
Newly planted borders should really have plenty of space for the plants to grow. However I like to have the ground completely covered so decided to add two bedding plants to help fill this area for the summer. My friends would never really associate me with bedding but occasionally I add it. My hanging basket had bright summer colours with greys but one colour caught my eye – a strong cerise pink.
I originally choose to connect the bottom space with the colours of my summer hanging basket. I bought plug plants – a cerise impatiens which I grew on in my greenhouse. They looked great in my September Bloom Day post but two days later, after a cold night, they looked a very sorry sight. I had also added the silver foliage plant cineraria – I have never been sure I like this but as my main plants, seen above, were small I thought I would add it to the mix for the short term. It could have lasted into winter but I yesterday when I cleaned up this border in preparing for planting bulbs I pulled the lot out! Oops – I can be quite ruthless.
Now with the cineraria and impatiens gone my eye is now drawn to the other plants once again. I lifted a small low growing rosette plant, celmisia, from another part of the garden which will look great when it spreads out. The border was now ready to plant some bulbs.
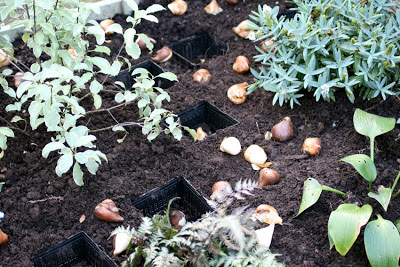
I am awful at growing bulbs – there I’ve said it! I suspect I mostly get the depth wrong. It perhaps starts out okay but maybe I’ll add mulches etc and then the depth changes. I also disturb bulbs when I weed by hand. I have tried an experiment for this year. I really would love to see a zing of deep coloured tulips here to give it a lift in the spring. I am quite happy to add a little colour but it has to work with the silver-greens. I planted a mix of ‘Queen of Night’ (28), ‘Antracite’ (28) and ‘Paul Scherer’ (24). They came in nicely labelled bags sold as a selection set. However I opened all bags and mixed them up in a basin before planting to give a more natural planting. It will be a surprise to see how they come up! I think they will look stunning here especially with the willow colour of the trellis.
My experiment was to plant some bulbs in small aquatic plant basket/pots and cover them up. You can see this in the photo below. I also planted in the pockets around these pots and hopefully that will protect them – from my hand fork! I am looking forward to seeing this area now next Spring. I am also delighted that, for once, I have planted my bulbs in time!!
 This small area now has lots of interest and in the short term I am looking forward to sedum ‘rose carpet’, growing in my hanging basket, coming into flower. I hope to see butterflies and bees coming to it too and then perhaps they will find there way into my Insect Theatre box hanging above! Now that would be interesting to see.
Finally, I would like to add that I had PC problems last weekend and lost almost three weeks of emails. Therefore I would like to apologise to anyone that has mailed me in this time if you have not had a reply.
The photos above were taken in my garden on September 25th and 26th 2007.
Thank you Shirl, for this very interesting post. Now I see your silver border….BTW I plant my flower bulbs in little pots too, but I have to do that in order to protect them from the attacks of the field mice we have. Otherwise I would loose a lot of the bulbs in winter.
Beautiful photos! From a beautiful flowers!
I love the willow green on the trellis and arbor! How attractive it is with the silver plants. I can grow all but the Pittosporum!
Hi again Barbara, Marie and Layanee 🙂
Barbara – Thank-you I hoped it would be 🙂 Funnily enough when I used the pots to plant my bulbs I did think it could protect them from wildlife too. Maybe that’s what’s happened to my bulbs over the years – they’ve been eaten! I hope this method works for my bulbs too – thanks for that 🙂
Marie – Thank-you! I really enjoy taking photos of my plants and they will be great to look back on in a cold dark winter’s day. Although, sad person that I am, I look forward to seeing the plants with frost and snow again so I can photograph them then too 🙂
Layanee – I get the sun in the morning and evening in this area so the willow green just lifts this whole area – I love it too. As I look out on it from my window now many of the plants look exactly the same willow colour – I chose them to match 🙂 I have no idea if I will be successful with the Pittosporum but I have just looked up my propagating book and I see I could take cuttings – I perhaps should try that! Thanks 🙂