First off, I should stress I am definitely no technical guru. However, I do work with the technology that brings the images from my camera nestbox to the videos you see on my blog. I have been quite comfortable with this.
There are many blogs and websites that show nestbox (nestcam) footage which will not necessarily have the same set-up as I work with. My OH is the tech guru behind mine which ultimately has been chosen to produce videos.
Okay, so not everyone has a computer, hardware and software to produce video… or perhaps even the desire to do so. Many people are simply looking to watch the nestbox action on their television screens.
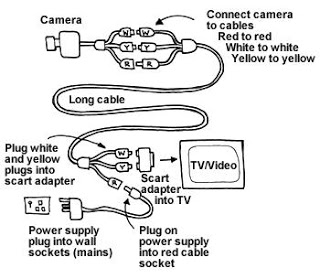
 The diagram opposite shows how easy this can be. I’d like to thank Mike at Handykam for allowing me to use his website image.
This set-up would work using a purpose built nestbox with camera or equally well with a camera kit. You may remember that last year I added a camera kit to the hedgehog house that my daughter made.
I guess you could use this set up with the long cable (with connectors) being passed through an open window. Although when not in use the cable and connectors would be outside and need to be protected from rain, cold etc in some way.
Following carefully the instructions in any kit/camera nestbox you choose to use, the alternative to this is to drill a hole through a wall to bring the cable and connectors through it. This is what we have chosen to do.
I myself, am very interested to hear details of the set-ups others (especially bloggers) have. It is in response to questions from others that I have written this post. If you are a blogger, you may have already posted/plan to post on the set-up and cameras you use. If so, then perhaps you might like to leave a link in a comment here for others to see.
Okay, to my set-up here at shirls gardenwatch. I now have two nestboxes with cameras. In both cases we have taken cables and connectors through the outside wall of our house. For each camera there is a set of red, white and yellow connectors outside and a set inside. Between the two nestboxes we have three cameras.
In addition to the nestboxes I have two further cameras. One is in the hedgehog house and the other is a wildlife camera with IR that I use on a tripod in the evenings to see the hedgehogs move around my garden. So that takes the total count to five cables and sets of connectors coming through my wall.
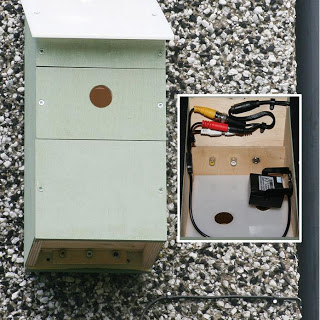
 Let’s start with our first camera nestbox sited on an outside house wall. In the photo opposite (click to enlarge) you can see the connectors at the bottom of the box. A base plate protects the connectors from the elements.
You can see a black cable just below this nestbox which runs briefly along the wall. It then disappears around the corner and runs down the back of a drainpipe. This cable then runs a short distance under gravel and then goes through the house wall at approx 12 cm up from the ground.
The inset photo shows a second camera we added to our nestbox – an infra red one (IR) so we could see inside at night and early in the morning when eggs usually are laid. We had to take this cable outside of the box just under the roof after clipping the connectors in place inside. This second cable also runs briefly along the wall (not shown in this photo) following the path of the first when it gets round the corner although they do go through different holes in the wall.
We now have three small holes through our wall although we didn’t envisage this in the beginning. I started with just two cameras. One in this nestbox and the other was a very basic outdoor IR camera fixed to an old tripod. I used the IR to watch and video the hedgehogs during the evenings as they visited feeding stations I set up for them. It’s great fun watching the hedgehogs.
I kept the IR camera outdoors with the connectors in a lidded box. When I used this camera I brought cable and connectors in through a window. On a cooler October evening you might expect that wasn’t a popular move for the rest in the household!
You can see why more holes through the wall were added. Being a gardener, I also wanted to limit the amount of cable visible. On the whole I think we have achieved that.
Fortunately, I have a great covering of ivy over my pergola where my other camera nestbox is located. My hedgehog house is in this vicinity too. Cables for both have been clipped to the trellis and posts there.
The cable and connectors for my present roaming IR wildlife camera (replacing the faulty original IR one) are housed in a lidded box hidden in a large shrub beside my pergola. I keep this higher quality camera (with its set of connectors) indoors and only bring it out when in use.
 Okay then… there is a paved path between the house wall and the pergola. Fortunately it is only one slab wide in the area we want to pass and the paving slab is not cemented in place.
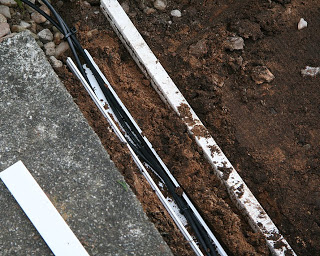
We chose to lift the paving slab and run the cable under it. We raked the gravel back alongside it. You can see that we have used basic plastic conduit to house the cables.
This conduit was then embedded in the sand beneath the paving slab. When we added the second camera nestbox we added a second piece of conduit.
Perhaps, had we envisaged so many cables we could have used a pipe system with no need to lift the paving slab after it was added. Hindsight is a wonderful thing! The conduit method still works well enough.
I should add here, that we made sure the cables were deep enough under the gravel and that it was securely clipped to the wall and to the pergola post to reduce the chances of the cable being pulled. OH also filled the holes (both inside and out) with silicon sealer as necessary.
Okay, now to the bit that I perhaps need my OH to read over to check I’ve understood everything well enough. I may need to edit this bit 😉
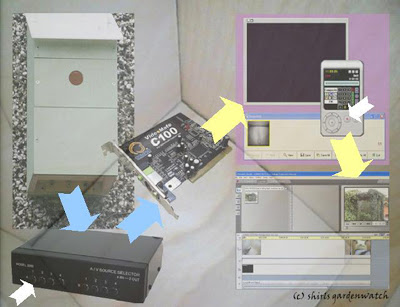
I have been pondering for some time on the easiest way to explain the more technical ‘path’ from the nestbox to a video ready for upload. A montage seemed the way to go. Let’s hope I’ve got this right. Here goes…
In basic terms the camera cable comes through the outside wall, inside my house and connects directly to a switcher box (blue arrow). I press one of four numbered buttons to cycle through my cameras (white arrow).

There are two cables leaving this switcher box (blue arrow leaving switcher box). I think one carries picture and the other sound. These cables connect directly to a video capture card which is in a slot in my PC. I hope you are still with me here.
My video capture card (similar to the one shown in the center of the montage) has software allowing me to see the images from my cameras in a window style screen that I can view on my PC monitor. I can see the images full screen but opt to view them smaller in the top right of my display while I work on other things.
This software also has an onscreen controller similar to one for a video/DVD player. I record by selecting from the controller using my PC mouse (see white arrow). I can also capture photos too. A strip of photos pops up adding them as I capture them. Before closing this software I need to save my photos to files in the usual way.
Recorded video from my cameras is saved automatically to my hard drive. I have other software to edit my captured videos. I have had this video software for many years and am very familiar with it (bugs and all).
I have a pretty old version of Pinnacle Studio. At the moment, the current version is 14… my version is 7! However, my older version generates background music and is one of the reasons that I still use it.
I should point out that all footage that I capture and use as video I have watched live. I don’t use any motion detector software that can capture images day or night. Yep, I will miss stuff. That’s just the way I like to do it. It’s like looking out my window to the action out there at that time. However, I can see how valuable the motion software is too. It is very popular. As I have no experience with this software perhaps others could tell us about theirs.
 I’d take a guess that not everyone has read to the end here. Please accept a virtual muffin to go with the cuppa you’ll be needing now. You’ve earned it 😀
I hope this has given a basic insight into the whole cameras in nestboxes thing and that this might help you to understand how it can work. If others give me links I’ll add them to the end here too. You can email me if you’d prefer.
As an extra bonus to all that did make it to the end, let’s take a look at a couple of my favourite nestbox scenes. The first video was taken just two days after our first camera nestbox went up.
There was great excitement when a pair of Blue tits visited. The male came in, the female followed, the male left and then the female inspected the property! Note she considers the view from the entrance out to the garden too. She also taps the wall noisily with her beak.
No extra background music in this video
The second video shows that one of the early activity in a nestbox is something known as a nesting shuffle. Birds will perform this when there is nothing in the box. I guess they are testing it for size.
It’s not until you see the shuffle with material in the box too that you can see why the female does this. She is making the nestcup for her brood.
No extra background music in this video
This is definitely enough tech for one posting. Next time, I’ll chat more in general terms about the basics of video editing and we can take a look at the whole video uploading thing.
Oops… most in the UK won’t see this as a Tuesday posting! I’ll need to get one prepared ahead for the next time 😀
This makes me think that even I might be able to hook up one of these gizmos. I would love to watch Carolina Wrens in a nestbox. They make such full-looking nests I wonder if I could see anything other than nest building. Hmmmmm
Oh Lisa, I am absolutely thrilled to hear that!! I was so very much hoping I would get a response like this from this posting.
I was trying to pitch it at those who have cameras and those who thought it was something they could never set up. I really am delighted 😀
Wow !….Your post has left me exhausted reading it,I understand most of it and your setup is excellent. I'm looking forward to your next posting when I hope with your information I can get to the bottom of uploading on (youtube).
Oops sorry there, David, perhaps I should have displayed a coffee cup photo warning here 😉
This one has exhausted me too! I have started it on many occasions over the last few weeks and couldn’t decide on the best way to show this. I spent some time playing around with images for the montage too.
I definitely wanted it to be of interest to regular readers as much as those using cameras already. I am going to be very interested in how my tech OH feels I have tackled this as he hasn’t read it yet.
Re the video uploading I’ll see what I can do for next week. Not sure how much time this one will take. I’ve a bit of work there collating videos to show the differences so it may be the week after. Once again, my biggest issue will most likely be on a good clear way to show this. I have a feeling a coffee cup warning should be in play for this one. I definitely have you in mind for this one 🙂
I confess to skipping through the first part a little but for anyone thinking of setting up a similar system this will be invaluable, a great idea. You never know I may well have the need to come back to this informative post in the future!
It was nice to find the reward at the end 😉 and I enjoyed the videos, particularly with the foot and beak sounds.
I also enjoyed your 'estate agent pitch' on the previous post 🙂
Hi again Jan, I completely understand. Reading must be a problem for you at the moment too. I hope your eyes don’t get any worse between now and your first op so that you can continue to enjoy pictures and images as you blog browse. I’d guess you’ll have a time limit each time you use your PC.
Yes, perhaps you may come back to this 🙂 I’m planning a series of postings on lot’s of stuff I’ve picked up and used whilst blogging. It would be a shame not to pass it on. All the info will be available through my menus too should you want to return to anything in the future. OH is working on a program so that I can access and edit these menus myself 🙂
I can’t see me not blogging now, but I do envisage time being an issue after the summer. I’ll just have to master shorter posts 😉
I always find it interesting to see how others set about capturing the private life of our garden visitors. Well explained. Your set up certainly gives really clear results Shirl. I hope your boxes get some permanent interest this year.
Good morning John, I thought you might. I was thinking if you when I wrote this one. I was quietly hoping you might consider telling us about your set-up too 😀
I keep thinking about it Shirl, and as you know it takes some thinking out as to the best way not to get too technical. Trouble is I keep altering things but I will probably get round to it in the not too distant future.
Thanks for the series of music-free videos over your last few posts, Shirl 😀
We don't have anywhere to put a bird box in our current garden, but I may come back to this post when we have finally managed to move house! I did appreciate the virtual muffin though 😉
Hi again Juliet, you are most welcome. Perhaps you’re not the only one that has this problem too.
Glad you enjoyed the virtual muffin! Yes, my thoughts are that this and future related postings will be filed in my drop down menus so you’ll be able to find them from there.
Good luck with the house move 🙂
Hi again John, I thought you must have considered this too. Yes, indeed I have attempted this one quite a few times in the last few weeks. Once I decided on the images I would use that helped start it off.
Now, I know what you mean about altering things too. That does make it tricky. Perhaps your starting point could be the things you’ve tried and no longer have and why you altered/changed them 🙂